If you’re trying to figure out what’s wrong with your lawn, you’re not alone — and you’re already thinking about it the right way. Most homeowners notice something is off and jump straight to a fix. Yellow grass gets watered more. Bare patches get reseeded. But when the fix doesn’t work, it’s almost always because the symptom was treated without identifying the cause. This guide walks you through lawn problem diagnosis methodically, before spending a dollar on any product. Lawn problems fall into three root categories: cultural, environmental, and biotic. Once you know which category you’re dealing with, the right solution becomes obvious.
Disclosure: This article contains affiliate links. If you purchase through these links, I may earn a small commission at no extra cost to you. As an Amazon Associate, I earn from qualifying purchases.
How to Figure Out What’s Wrong With Your Lawn Before You Treat Anything
Understanding which category your issue belongs to is the single most important step — because the treatment for a fungal disease is completely different from the treatment for compacted soil or a grub infestation.
The three categories are:
- Cultural problems — caused by what you’re doing or not doing. Watering habits, mowing frequency, fertilizer application, and thatch buildup all fall here.
- Environmental problems — conditions outside your immediate control, including soil compaction, poor drainage, shade, and soil pH imbalance.
- Biotic problems — living organisms causing damage. This includes fungal diseases, insect pests, and weeds.
Many homeowners jump straight to a product. A better approach is to spend ten minutes observing before acting.
Start With the Pattern, Not the Symptom
- Uniform yellowing or browning across the whole lawn → usually a cultural or soil issue, like nitrogen deficiency, compaction, or underwatering
- Circular or irregular patches → often disease, especially fungal
- Damage concentrated at edges or along fence lines → often insect activity or traffic patterns
- Damage following a straight line or paralleling your driveway → almost always chemical — fertilizer burn, herbicide drift, or road salt from de-icing
The pattern is your first and fastest diagnostic clue.
Gather Context First
Before you get down on your hands and knees, answer these questions honestly: Gray leaf spot — elongated gray lesions on blades, most common on ryegrass and St. Augustine in hot weather Gray leaf spot — elongated gray lesions on blades, most common on ryegrass and St. Augustine in hot weather
- When did you last water, fertilize, or apply any product to the lawn?
- Has there been unusual weather recently — extended drought, heat stress, heavy rain, or a late frost?
- Is the damage spreading, staying stable, or actually recovering on its own?
- What grass type do you have? Cool-season grasses like tall fescue and Kentucky bluegrass behave differently from warm-season grasses like Bermuda or zoysia, especially around dormancy and disease susceptibility.
Write these down if it helps. The answers will shape every conclusion you reach in the next steps.
What’s Wrong With Your Lawn’s Color? Yellow and Brown Grass Explained
Yellow and brown are the most common visible symptoms, but they have at least six distinct causes. Treating them the same way is one of the most common mistakes homeowners make.
Uniform Yellowing Across the Lawn
When the yellowing is consistent and spread evenly, the most likely causes are nitrogen deficiency or underwatering — two very different problems that produce similar colour.
To tell them apart:
- Check soil moisture first. Push a standard six-inch screwdriver test into the soil. If it goes in easily, moisture is probably not the issue. If it meets hard resistance, the soil is too dry and the grass may be drought-stressed.
- Check your fertilizer schedule. If you haven’t applied nitrogen in the last six to eight weeks during the growing season, deficiency is likely.
A third cause of uniform yellowing is soil pH being out of range. When pH is too low or too high, grass can’t absorb nutrients even when they’re present. A basic soil test kit — available for under $15 at most hardware or garden stores — can confirm this quickly. It’s worth doing at least once every few years.
If individual grass blades have brown tips but the plant looks otherwise green, the cause is usually mechanical rather than nutritional.
- Dull mower blades tear rather than cut grass, leaving ragged tips that dry out and turn brown. This produces uniform browning across the entire mowed surface.
- Fertilizer burn from over-application causes a similar brown colour, but it’s patchy. It follows the path of your spreader — straight lines, overlap zones, or wherever product was concentrated.
These two causes are easy to separate. Mowing damage is uniform across the whole lawn. Fertilizer burn has a clear spatial pattern tied to where you walked.
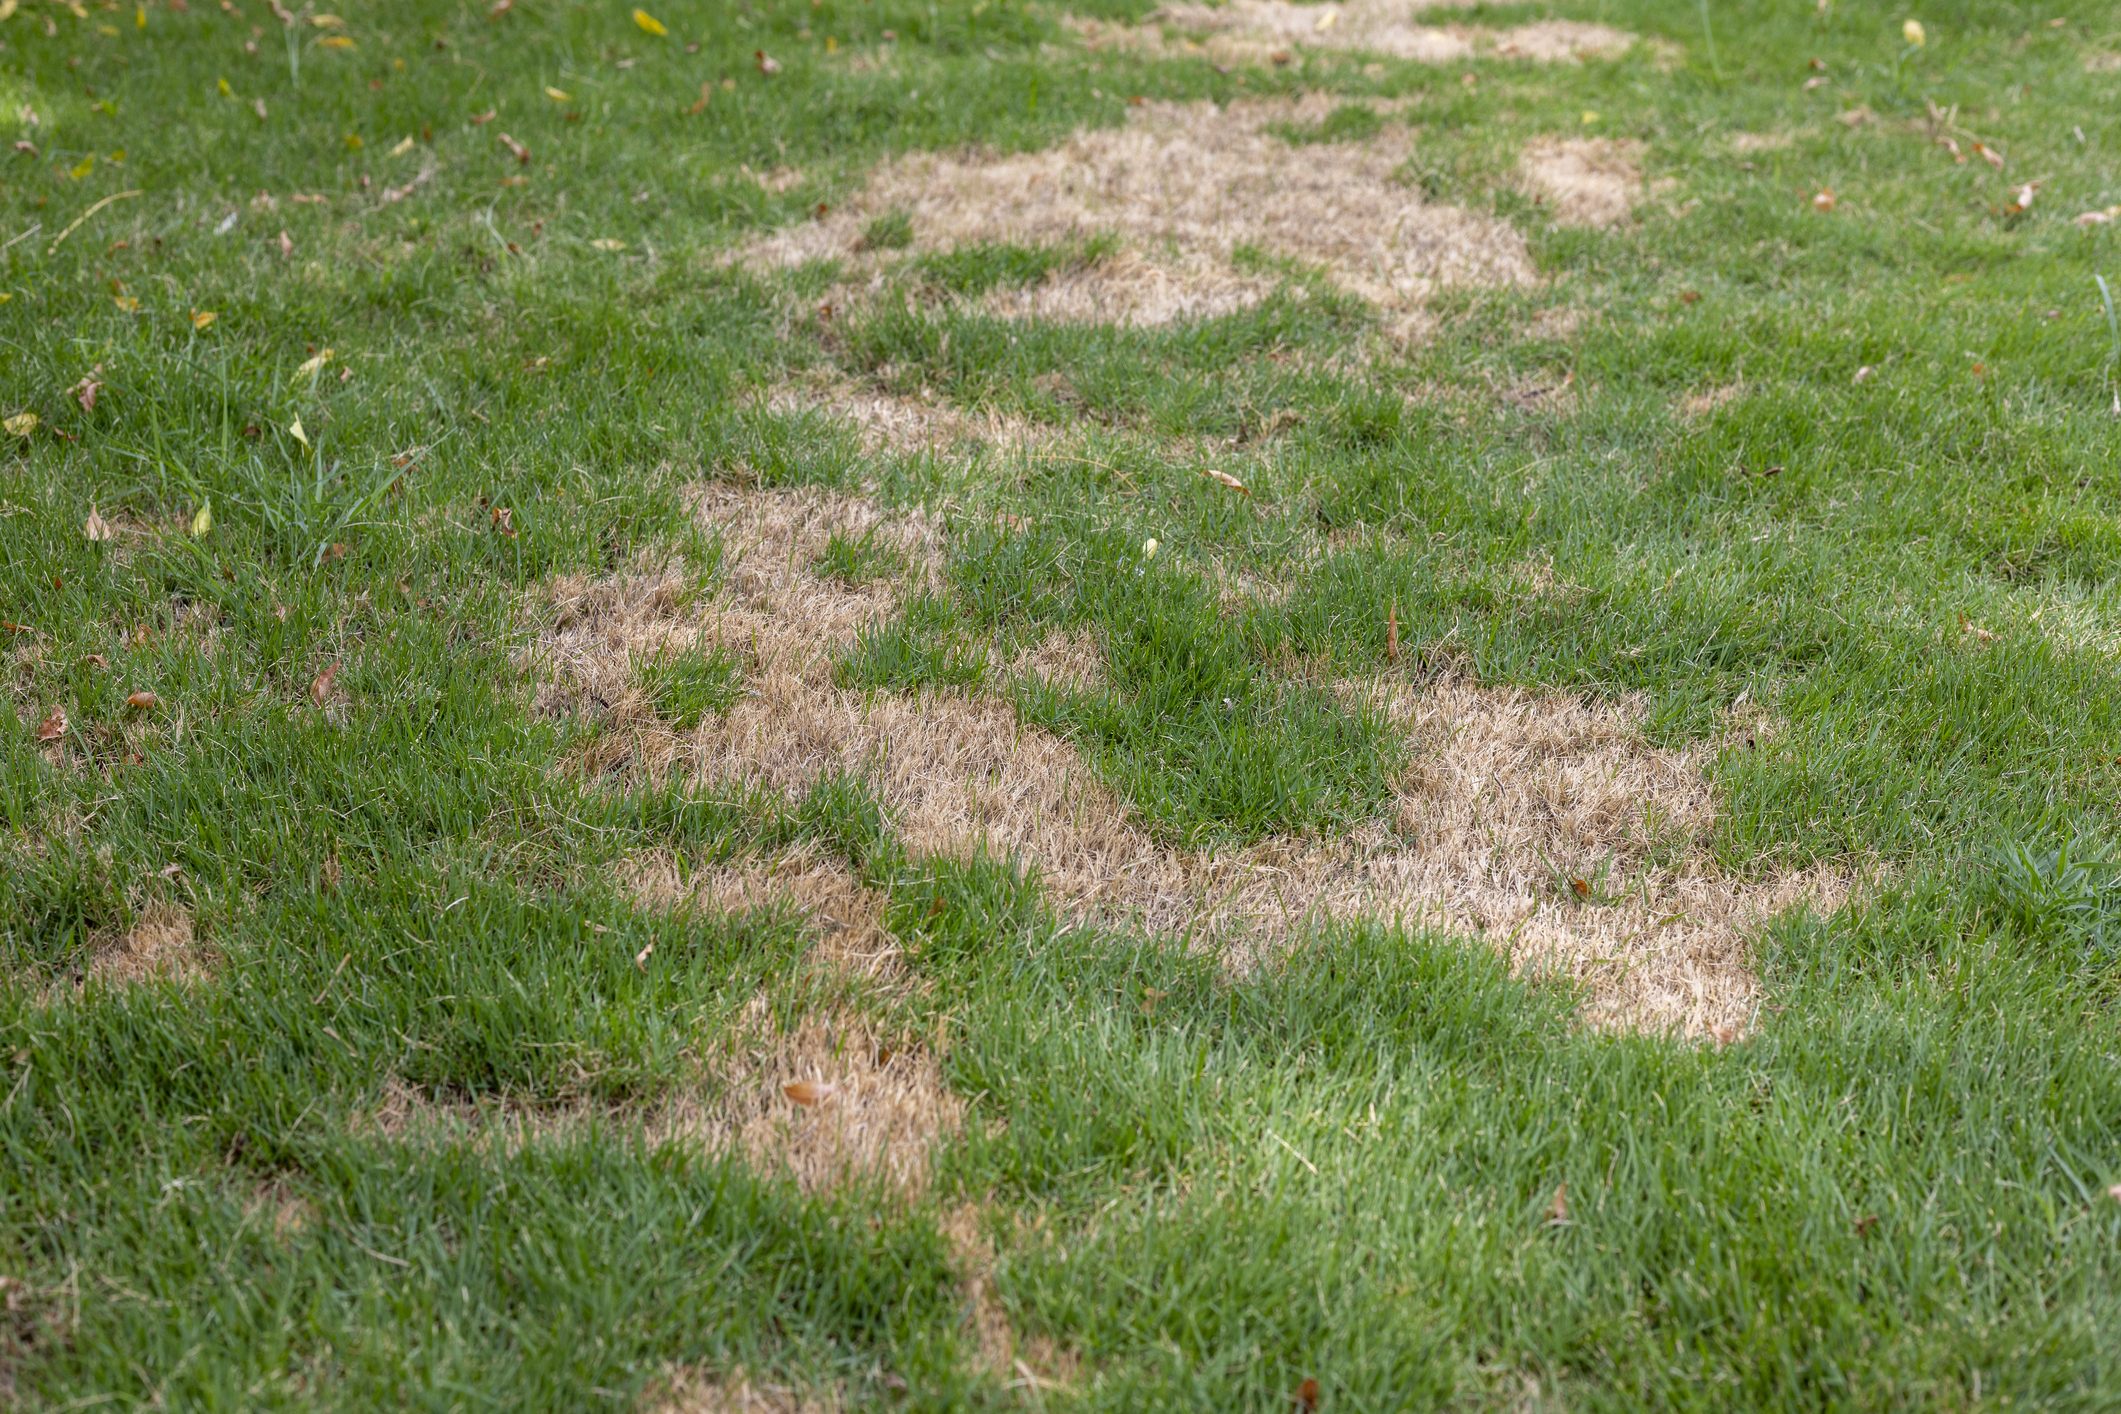
Yellow or Brown in Irregular Patches
Patches that don’t follow a clear geometric pattern — and aren’t related to traffic or shade — are the most likely sign of disease or insect activity. This symptom warrants a ground-level inspection before drawing any conclusions. Both causes are covered in detail in the diagnosis section below.
Seasonal Brown — Dormancy vs. Death
This distinction matters enormously. Dormant grass needs time, not intervention. Dead grass needs renovation. Brown patch — circular rings one to three feet wide, common in warm and humid conditions, often with a smoke ring appearance at the border
- Cool-season grasses (fescue, bluegrass, ryegrass) go dormant and turn tan during extended summer heat and drought.
- Warm-season grasses (Bermuda, zoysia, St. Augustine) go dormant in winter and turn beige-brown until temperatures rise.
Dormant grass looks uniformly tan and has a dry, straw-like appearance. Dead grass looks similar but behaves differently under the tug test. Grab a handful and pull firmly. Dormant grass has intact roots and resists — it stays in the ground. Dead grass lifts out with little resistance, often pulling up in a loose mat.
If you’re unsure, leave it alone for two to three weeks and watch for any green regrowth at the base of the plants.
Bare Patches and Thinning Turf — Common Causes and What to Do Next
Bare patches are a separate diagnostic category from yellowing because the grass is absent entirely, not just discoloured. The cause shapes both the repair method and the timing.
High-Traffic Wear
Wear damage is recognizable by location. It appears on footpaths between play equipment, along fences and gates, and in any area that receives regular foot traffic. The underlying cause isn’t just surface wear — it’s compacted soil beneath the surface.
Compacted soil has no air space for roots to grow. Grass thins and eventually disappears even when watered and fertilized normally. Reseeding over compacted soil without fixing the compaction is a common failed repair. Aeration — using a core aerator to pull plugs from the soil — is the necessary first step before any seed is applied.
Shade Thinning
If thinning is appearing gradually under trees, along the north side of buildings, or anywhere canopy has increased, shade is likely the cause. Grass needs sunlight to photosynthesize and maintain density.
Different species have different shade tolerances:
If you use pre-emergents to prevent weeds in warm-season turf, timing matters — applying too early or too late can stress the lawn and create conditions that mimic other damage, so understanding when to apply pre-emergent herbicide on warm-season grass in the South helps you rule out herbicide-related causes during diagnosis.
- Among cool-season grasses, fine fescue handles moderate shade better than most.
No grass survives in deep shade. If a tree canopy has closed in significantly, the honest answer may be ground cover plants or a mulched bed rather than another round of grass seed.
Grub Damage
White grubs — the larvae of beetles like Japanese beetles and chafers — feed on grass roots below the surface. The symptom is turf that peels back like a loose carpet. The roots have been eaten, so nothing is anchoring the sod.
To confirm, peel back the affected section and inspect the soil beneath. Count the white C-shaped larvae you find. Six or more per square foot indicates a significant infestation. Grub damage symptoms are most visible in late summer and fall, when larvae are actively feeding and summer heat stresses the already-weakened turf.
Patch Disease
Some fungal diseases cause clean, circular bare patches that look superficially similar to wear damage. The distinguishing feature is the shape and edge. Disease patches are often ringed with a band of darker or bleached grass. The patches also tend to be more geometrically round. Wear damage is irregular and path-shaped.
This is covered in more detail in the disease section below.
What’s Wrong With Your Lawn: Disease, Pest Damage, or Cultural Problems?
This is the core of lawn problem diagnosis. The symptoms of disease, pests, and cultural mistakes overlap significantly — which is why misdiagnosis is so common. The key is identifying the mechanism, not just the appearance.
Identifying Fungal Disease
Fungal lawn diseases are almost always triggered by a combination of conditions. No single factor causes them alone. Moisture on the blades overnight, high humidity, warm temperatures — these factors combine to create conditions where fungal disease spreads quickly. Sometimes excess nitrogen plays a role too.
Signs of fungal disease include:
- Web-like mycelium (fungal threads) visible on blades in early morning before dew dries
- Bleached, water-soaked, or tan spots on individual blades
- Orange or rust-coloured powder on grass blades — a classic sign of rust fungus
- Circular or ring-shaped patches with distinct edges
- Dollar spot — small bleached patches the size of a silver dollar; individual blade lesions with tan centres and brown borders
- Brown patch — circular rings one to three feet wide, common in warm and humid conditions, often with a smoke ring appearance at the border
- Gray leaf spot — elongated gray lesions on blades, most common on ryegrass and St. Augustine in hot weather
- Powdery mildew — white powdery coating on blades, almost always in heavily shaded or poorly ventilated areas
- Fertilizer burn: Bright yellow-to-straw patches following a straight spreader path, with sharp edges. Usually appears within a few days of application.
- Herbicide drift or over-application: Watch for twisted, curled, or distorted blade growth after broadleaf herbicide contact. Sudden brown patches with no other explanation can also follow accidental overspray.
- Compaction: Turf that grows slowly and doesn’t respond to fertilizer or water. Surface water pools after rain. The screwdriver test — as described above — will fail even when the soil isn’t dry.
- Thatch buildup: A spongy, bouncy feel underfoot. Water beads on the surface rather than soaking in. To measure, pull a small plug and look at the layer between the green blades and the soil. More than half an inch of thatch warrants dethatching.
- Lawn problems fall into three categories: cultural, environmental, and biotic
- Pattern and distribution tell you more than colour alone
- The tug test separates dormancy from death; the screwdriver test assesses moisture and compaction
- Disease, pests, and cultural mistakes have overlapping symptoms — inspect at blade and soil level before concluding
- A soil test is a low-cost tool that eliminates guesswork around nutrients and pH
- Identify the cause first; treat second
Common diseases and their identifying features:
If fungal disease is confirmed through these visual cues, a dedicated lawn fungicide is the right treatment. Look for products containing azoxystrobin or propiconazole — both are widely available at hardware stores and work across a range of common fungal diseases. Apply early. Disease progresses quickly in favourable conditions.
Identifying Insect Pest Damage
Grubs (subsurface): Spongy turf that lifts easily, secondary digging from birds, raccoons, or skunks, and patches that expand through late summer are all indicators.
Chinch bugs and sod webworms (surface): These feed at or near the soil surface. They create irregular brown patches that often start at lawn edges and spread inward. To check for chinch bugs, use the float test. Cut both ends off a large coffee can, push it two inches into the soil at the edge of the damaged area, fill it with water, and wait ten minutes. Chinch bugs will float to the surface.
Armyworms: These caterpillars cause rapid, widespread browning — sometimes an entire lawn section turns brown within 48 hours. They’re visible to the naked eye, especially in early morning or evening, and are most common in late summer across the southern and mid-Atlantic states.
Recognizing Cultural and Mechanical Problems
These are caused by what you do — or don’t do — to the lawn:
Step-by-Step: How to Diagnose What’s Wrong With Your Lawn in 10 Minutes
This process applies regardless of what you’re seeing. Run through it before buying anything. It takes about ten minutes and will tell you more than most product labels ever will.
Step 1: Step back and map the pattern. Walk to the highest point you can and look at the full lawn. Note whether the damage is uniform, patchy, circular, edge-heavy, or path-following. Take a photo for reference. The pattern alone will often tell you what’s wrong with your lawn before you take another step.
Step 2: Answer the context questions. Think through your last watering, last fertilizer application, last product use, and any recent weather events. Write it down. A drought two weeks ago can still be causing symptoms today, and a misremembered fertilizer date can send you in the wrong direction entirely.
Step 3: Do the tug test. Grab affected grass at the base and pull firmly. Does it hold? Does it lift cleanly? Does it peel back like carpet? Grass that holds has living roots — likely dormant or disease-stressed. Grass that lifts out easily is dead or grub-damaged. Grass that peels back in a mat almost always means grub activity below the surface.
Step 4: Do the screwdriver test. Push a six-inch screwdriver into the soil in and near the affected area. Note the resistance. Easy entry means adequate moisture. Hard entry when the weather hasn’t been dry points to compaction, not drought. This single test separates two of the most commonly confused problems in lawn diagnosis.
Step 5: Inspect at blade level. Crouch or kneel at the edge of the damaged area — the transition zone between healthy and damaged grass is the most informative spot. Look for web-like growth on blade surfaces, discoloration patterns on individual blades, insects at the soil line, or larvae just below the surface. Healthy grass right next to damaged grass often shows early symptoms you’d otherwise miss.
Step 6: Assign a category. Based on what you’ve observed, assign the problem to cultural, environmental, or biotic. If it fits two categories, note both — some problems are compounded. A lawn weakened by compaction, for example, is more vulnerable to disease and pest damage at the same time.
Step 7: Research the specific cause before treating. Once you have a category and a likely mechanism, you’re ready to look at targeted solutions. A soil test kit is worth the small investment if nutrient deficiency or pH imbalance is suspected. It eliminates guesswork before you spend money on fertilizer, lime, or sulfur. If you still aren’t sure what’s wrong with your lawn after working through these steps, narrow it to two possible causes and test for the more treatable one first.
Frequently Asked Questions About Lawn Problems
Why does my lawn have yellow spots but the rest looks fine? Isolated yellow spots are usually caused by disease, fertilizer burn, or pet urine. Check the shape and edge of the spot. Sharp, straw-coloured edges that follow a path point to fertilizer burn. Circular spots with a darker border point to fungal disease. Round spots in high-dog-traffic areas are almost always urine damage.
How do I know if my lawn has grubs? The clearest sign is turf that feels spongy underfoot and lifts away from the soil like a loose mat. You may also notice birds or wildlife digging in the lawn. Peel back a small section of affected turf and look for white C-shaped larvae in the top two inches of soil. Six or more per square foot is a significant infestation.
Why is my lawn dying in patches even though I water it? Patchy die-off despite regular watering usually points to one of three causes: fungal disease, grub damage, or compacted soil that prevents water from reaching roots. Use the pattern, tug test, and screwdriver test to narrow it down before treating.
Is my lawn dead or just dormant? Pull a small handful of grass from an affected area. Dormant grass holds firm — the roots are alive and anchored. Dead grass comes up easily with little resistance. If you’re still unsure, wait two to three weeks and look for any green growth returning at the base of the plants.
Why won’t my lawn grow back after I reseed it? Failed reseeding is almost always a soil problem. Seed planted over compacted soil, heavy thatch, or soil with extreme pH won’t establish properly. Before reseeding, address the underlying issue — aerate compacted areas, dethatch where needed, and test the soil pH. Seed needs direct soil contact and the right conditions to germinate.
Conclusion
The most valuable thing you can do when something is wrong with your lawn is slow down before acting. Lawn problem diagnosis is a skill. Like any skill, it gets faster with practice.
The core framework is simple. Identify the pattern. Gather context. Test for moisture and compaction. Inspect at ground level. Then assign the problem to a root category before choosing a treatment.
Most lawn problems fit into a small number of recognizable patterns. Knowing those patterns is the difference between a fix that works and money wasted on the wrong product. Here are the key takeaways to remember:
Once you’ve diagnosed the problem, the next step depends on what you found. Widespread thinning with poor soil structure points toward lawn renovation. Watering-related symptoms are best addressed with a consistent irrigation schedule. Fungal or pest problems may need targeted products — but only after the underlying conditions that enabled them are addressed first.
Subscribe to our Newsletter for Weekly updates!